Friday, June 29, 2012

Dress up the Livingroom: Project one

The apartment we live in has white walls. and we aren't aloud to paint or hang wall paper so instead of wallowing  in self pity  over not being able to paint I decided to do something about it. My first project was this cute way to display my kids art work! I am so happy with how it turned out except that i should have waited and has David hang the frames because they aren't really straight. Oh well! I left them anyway they still look cute! I may have him fix it later. :)


All i did was tear apart some old junkie frames I got from Wal-Mart  years ago and hot glued a strip of wire to them. Then I attached a clothes pin and my kids art work!  I plan to paint the clothes pins black but I didn't have time for that and I am impatient, I couldn't wait to hang them up!

A Crafty Day!

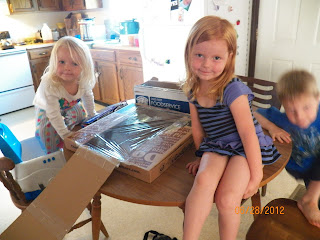
Today we did a variety of different things off of our list! The kids helped me clean the house super well a few days ago So I decided we would just have a craft day! 

Pizza Box oven!
Cut a whole in the lid.

Cover the whole with plastic wrap

Line the cut out lid and the inside of the box with aluminum foil and you are ready to bake! I forgot to take pictures of the baking part. Whoops! Oh well we are goign to do it again soon so I will add more later. :)
Then we researched Solar power!

Alexis was not into Soalr power research so we made a paper plate apple


Evanny saw that Evanny was doing something fun and jumped in

Alexis paper plate apple. :)
Bubbles!!

So i made cool huge bubble wands out of wire hangers and we made our own bubble solution! Yay right! Nope ti was  abig fail. :( and it was 105 degrees outside. But we tried.


Thursday, June 21, 2012

Book shelf re-purpose/closet organization

 The boys room needed some organization help so I took things into my own hands and got out the drill!! I pre-drilled all the holes and screwed the boards to the wall! I was so proud of myself! LOL All I needed was to have David cut the shelves to size.

So where did I get the boards?  an old book shelf! you know the junkie press board ones from Walmart.  Well our was falling apart so I tore it apart and reused it I screwed the sides of it to the closet wall with the peg holes facing out and then i just used the pegs and shelves that were used with the book shelve. All i had to do was hang it up and then cut the shelves to size! Super easy and it turned out great!

So here is what there room looked like before.


And here is after!! So much better!


Wednesday, June 20, 2012

Tutus and fruit leather

Ok Tutus and Fruit leather is a weird combination but I had so many things to update because once again I got behind on my blogging but I had so much I wanted to share! so I combined these two !


I also found this idea on pinterest from this blog! a scrap material tutu. I think Alexis' tutu is beautiful!! and she liked ALOT!  I just cut the material into strips and tied it on a piece of elastic and voila! A tutu 

Now for the fruit leather!

First I put 4 cups of fruit in a sauce pan (I used strawberries and blueberries) and cook them  until bubbly.  I then put them in a blender and pureed the fruit.

Then I poured the pureed fruit on to a cookie sheet lined with parchment paper and then we placed them in our hot van! (yep I said van)  and we let it sit for 8 hours or so until it was dried. Then we cut ti into strips and ate it.  It was delicious!

the dried fruit puree.


Printed T-shirts

I found this idea on pinterest and it worked beautifully!!  The kids colored on sand paper with crayons. Then I placed a piece of cardboard inside the t-shirt to keep the colors from bleeding through to the back. then i placed the drawing on the front of the shirt drawing side down and put a piece of construction on top of that and then using a hot ironed pressed each one for about 30 seconds and tada! Very cute shirts!

****UPDATE  Make sure you dry the t-shirt on high heat for 
at least 20 minutes before wearing to set the color!******


Summer Activity List

We decided to make a list of fun things to do with the kids this summer. I am goign to put our list here and then add pictures as we do each thing! we have done a lot already but have many more things that we plan to do! I found most ideas via pinterest! So here is the list I will be adding more things as we think of them. :) I am linking them to blog posts with pictures and Highlighting the ones we have done but don't have pictures of.


  1. Painting with Hands and Feet
  2. Glow sticks in the bathtub
  3. Fossil Digger-bury dinosaur bones in sand and then find them!
  4. balloon tennis
  5. Shave with Daddy (using Popsicle sticks of course!)
  6. Blow up a balloon  with baking soda and vinegar
  7. Hot lava floor ( use pillows as rocks and the floor is hot lava you cant touch!)
  8. Marker mirror faces
  9. Mess-less makeup
  10. write letters ok we have done this and they are still sitting on the counter waiting to be mailed!
  11. make a band
  12. fly a kite
  13. have a tea party
  14. make giant bubbles, bubble wands,and other bubble fun
  15. paint with ice cubes
  16. mini marshmallow construction
  17. Bird feeder
  18. tear drop volcanoes
  19. printed t-shirts
  20. Paper plate turtles
  21. Laser obstacle course
  22. Friendship bracelets
  23. Lego Car
  24. Catch firefly's
  25. Go camping
  26. Pizza Box Oven

Pallet Book Shelves

We had a book shelf but the kids had trouble getting the books on right and it annoyed me so I made these pallet book shelves. Not only for ease of putting away but they are also very space efficient and it was free!! we got pallets from Davids work and we already had paint. we just a had to borrow a few tools from my father in law. and we ended up with these beautiful shelves.

My husband cut the pallet into three sections. The third section was  not the same size so we didn't use it.  we also used two slats off of a pallet.

I screwed the slats to the bottom.
then we painted!

and here is the finished product!

I need another small one for board books. I will update when we get the chance to build  it!


Monday, June 11, 2012

Cauliflower crust pizza

A few months back we learned that our baby couldn't tolerate wheat. and so we just took it away from him it was great! he screamed less and he was actually happy! And he started gaining weight and his diaper rash that looked like a chemical burn went away!! So first we just didn't allow him to have wheat but my other kids had it everyday.  The problem was they would drop stuff and he would pick it up and eat it and every time he got a bite of wheat or gluten filled products he would get a rash again so we decide that for now our whole family is going to eat gluten free. So we cleaned out our cabinets and removed everything that contained gluten.  But sadly a lot of really yummy food has gluten in it. So I have had to re learn how to cook for my family.  Pizza was one of the foods that we really wanted to have. So a friend suggested cauliflower crust pizza so I headed over to pinterest to find a good recipe. :)  I found a few good ones and then i tweaked them.  So here is the recipe to our cauliflower crust pizza.

Cauliflower Crust Pizza
1 head of steamed and shredded cauliflower (about 2 cups)
1/2 cup Italian cheese blend(parmesan, asiago, romano and provolone)
1/2 cup mozzarella cheese
1 Tb Oregano
1Tb Basil
2 cloves garlic, crushed
1 egg

Mix ingredients together pat onto pizza pan adn bake 15- 20 minutes at 400 degrees. Then top and bake until cheese is melted and pizza is heated through! Delicious pizza and my husband said it was even fabulous the second day.


Thursday, June 7, 2012

Bird Feeders

We saved toilet paper rolls to make bird feeders out of.

First we covered our toilet paper rolls with peanut butter


Then we rolled them in birdseed

and voila! Beautiful bird feeders!

Then we hung them in the trees and watched the birds. They picked them clean  by the next day!

Project Reorganize My Life!

I get so frustrated with clutter!!! I am sure you do to. So I made a list of things I want to do this summer to help re organize my life.  I am going to make a list here and add to it and also add pictures of what I have done as I do it.  I hope you enjoy!
  1. Daily Cleaning schedule
  2. Daily Routine
  3. 30 Day Meal Plan
  4. De-clutter again
  5. Sanity Hour kits(AKA Quiet time)

Cleaning schedule that we all do together.  I put each room on a different day and we all work together. Also each kid has a specific job for the room of the day. For example on Tuesday when we are doing laundry David folds socks, Alexis folds Cloths, and Evanny folds diapers. and they they each put their own laundry away.
2. Daily Routine and I also did a new chore thing for my kids.  The three slots are whining, rewards, and consequences.  So if they whine because they have to do a chore they draw  an extra chore from the whining slot, if they do something really good that impresses me they get to draw a reward, if they are disobedient they draw a consequence.


ahh! I am distressed

Aahh! I am distressed okay not really but it seemed like a catchy title. My cousin had this fabulous idea about making our own distressed jeans so she brought her supplies over and we got to work.

So I had to hem these jeans up and now they look nerdy so My cousin Jennifer came over to help me  distress them. She brought her tools a box knife, a file, and a grater that is apparently supposed to be for nuts it kinda looks like it should be for citrus fruit.
So we drew lines where we wanted holes and then we cut the holes with the box knife.

Then we took the file and filed all of the cuts to make a rough look.


Here is one of the finished holes.

and the finished product!  They are a little less nerdy and they are pretty cool looking.  We also roughed up the bottom hem and the pockets.